


This chapter explains how to use the CodeWarrior IDE text editor to edit your source code.
You can also customize options that affect the way the CodeWarrior editor works. To learn more about how to do this, refer to "Editor Settings" on page 269.
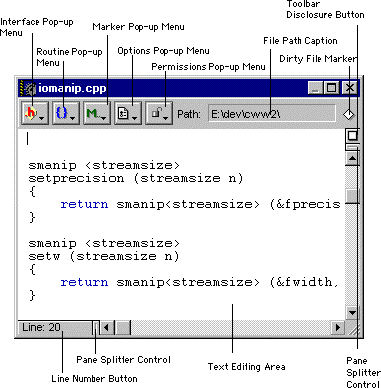
The CodeWarrior editor window, shown in Figure 5.1, contains elements you'll find useful when viewing and editing your source files.
To see an editor window, create a new text file using the New Text File command on the File Menu.
The sections that follow describe the elements of the editor window shown in Figure 5.1.
The Text Editing Area of the editor window is where your text is entered and edited.
For more information about drag and drop operations with text, see "Moving Text (Drag and Drop)" on page 150.
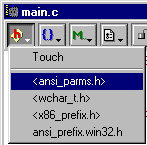
 Use the Interface pop-up menu shown in Figure 5.2 to open interface or header files referenced by the current file. You can also use the Touch and Untouch commands from this pop-up.
For more information on opening files, see "Opening an Existing File" on page 108.
To learn more about touching files, see "Touching and Untouching Files" on page 89.
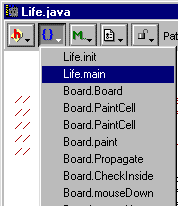
 Use the Routine pop-up menu shown in Figure 5.3 to set the current location of the text insertion point in your text files.
 NOTE
NOTE
NOTE
NOTE
If you'd like to change the default display order of the routines to alphabetical, enable the Sort function popup option. See "Editor Settings" on page 269 for more information about editor options.
 TIP
TIP
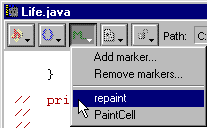
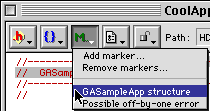
 Use the Marker pop-up menu shown in Figure 5.4 to add and remove markers in your text files. These markers are easy to use and convenient for quick access to a line of text, remembering where you left off, and other identification purposes.
For more information on using markers, see "Adding, Removing, and Selecting a Marker" on page 154.
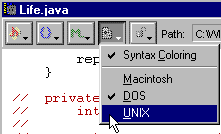
 Use the Options pop-up menu, shown in Figure 5.5, to turn color syntax highlighting on or off for the current file, and also to set the format for how to save the file.
To enable or disable syntax highlighting, choose Syntax Coloring from the Options pop-up menu.
For more information on the Syntax Coloring option shown in this menu, see "Syntax Coloring" on page 274.
The VCS pop-up menu indicates the read/write revision control database status of the current file. If the pop-up icon box shows an Unlocked icon or the Read/Write icon, you can modify the file you're working with. The icons and their meanings are described in the section called "Common VCS Operations" on page 593.
For more information about revision control system software, see "Common VCS Operations" on page 593.
The CodeWarrior IDE automatically displays the directory path of the current file in the File Path Caption, which is at the top right of the window shown in Figure 5.1 on page 134.
To learn about another method of determining the path of a file, refer to "Path Pop-Up Menu (Mac OS)" on page 141.
The Dirty File Marker tells you if the file displayed in a window has been modified since it was last saved or opened. The states of the Dirty File Marker are listed in Table 5.1.
|
State
|
Description
|
|---|---|

| |

|
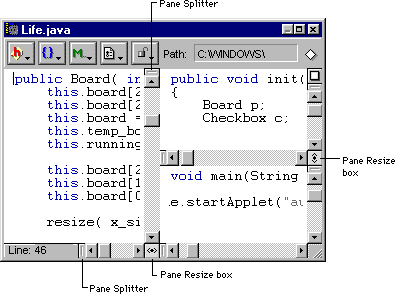
You use these controls to adjust the sizes of the panes after you've created them. Figure 5.8 on page 143 shows an editor window with multiple panes.
For more information on this topic, see "Splitting the Window into Panes" on page 143.
The line number box shown in Figure 5.1 displays the number of the line that contains the text insertion point. You can also use this button to go to another line in the file.
For information about setting the text insertion point on another line, see "Going to a Particular Line" on page 157.
The Toolbar Disclosure Button hides or displays the editor window's toolbar along the top of the window. If the toolbar is hidden, a row of smaller controls appears at the bottom of the editor window (see Figure 5.7 on page 142).
For more information on using the Toolbar Disclosure Button, refer to"Seeing Window Controls" on page 142.
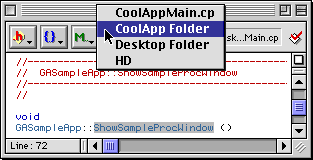
To see the directory path of the file in the active editor window, press the Command key and click on the name of the file in the title bar of the window, as shown in Figure 5.6. You can also directly open a folder by choosing it from the menu.
You use the Font & Tabs preference panel to set the size or font used to display text in an editor window. For more information on this topic, see "Font & Tabs" on page 273.
The row of pop-up menus and controls that appears along the top of the editor window is called the toolbar. The Toolbar Disclosure Button, shown in Figure 5.1 on page 134, is used to show or hide the toolbar.
However, if you hide the toolbar, the default pop-up menu controls are displayed along the bottom of the editor window, as shown in Figure 5.7. Note that the File Path Caption is no longer visible.
NOTE
You can choose a default setting to display or hide the toolbar in editor windows. To do so, see "Toolbar Disclosure Button" on page 140 for more information. See also "Showing and hiding a toolbar" on page 308.
You can split the editor window into panes to view different parts of a file in the same window, as shown in Figure 5.8. This section describes creating, adjusting, and removing multiple panes.
You can also double-click the Splitter Bar to split a pane into two equal parts.
 To change the sizes of the panes in an editor window, click and drag the pane resize boxes.
You can also double-click on a Resize Box to remove a split.
 WARNING!
ckid resources to lock the files, the information is saved for you without checking out the file.
To learn more about configuring editor window settings, refer to "Font & Tabs" on page 273.
To learn about saving default settings for browser windows, see "Saving a Default Browser" on page 247.
The topics in this section are:
The CodeWarrior IDE lets you configure how the scroll bars affect the window view when you drag the scroll bar thumb around. You can modify the way that scrolling behaves in the editor windows of your project by changing the Dynamic scrolling option. To learn how to do this, refer to "Dynamic scrolling" on page 271.
Table 5.2 describes how to move the insertion point around in a file with function keys.
For information on Solaris modifier key settings, see "Special note for Solaris users" on page 23.
|
To move insertion point to
|
Windows |
Mac OS |
Solaris |
|---|---|---|---|
For information on Solaris modifier key settings, see "Special note for Solaris users" on page 23.
|
To move insertion point to
|
Windows |
Mac OS |
Solaris |
|---|---|---|---|
To add text to a file you've opened, click once in the Text Editing Area of the window to set the new location of the text insertion point. After you see the insertion point at the new location, you may begin typing on the keyboard to enter text.
To read about different ways to move the insertion point in an editor window, see "Basic Editor Window Navigation" on page 145.
There are several different methods for deleting text.
To delete text that you just typed, press the Backspace/Delete key.
To delete text that is in front of the text insertion point, use the Delete/Del ( ) key.
If you don't know how to select text, read "Selecting Text" in the next section.
There are several different ways to select text in the editor window.
Select text by holding down the Shift key while pressing any of the shortcuts listed in Table 5.2. You may also select a word, a line, or a range of text.
To select a line:
This selection method is available when the Left margin click selects line option is on in the Editor Settings preference panel.
This selection method is available when the Left margin click selects line option is on in the Editor Settings preference panel.
To display and highlight an entire routine in the editor window, press the Shift key while selecting a routine in the Routine Pop-Up Menu. This is particularly useful for copy and paste operations and for using drag and drop to move code around in your file.
For information on Solaris modifier key settings, see "Special note for Solaris users" on page 23.
|
To select text to the
|
Windows
|
Mac OS
|
Solaris
|
|---|---|---|---|
For more information about using drag and drop with text, see "Moving Text (Drag and Drop)" in the next section.
You can also select blocks of code quickly using the Balance command. To learn how to do this, refer to "Balancing Punctuation" on page 150.
If you have some text in your editor window that you would like to move to a new location, you can use the drag and drop features of the editor to do it. In order to use drag-and-drop editing, this feature must be enabled in the IDE. To learn more about turning this feature on or off, refer to "Editor Settings" on page 269.
TIP
There are standard menu commands available on most computer applications, called Cut, Copy, Paste, and Clear. In the CodeWarrior IDE, these commands appear on the Edit Menu.
For more information about these commands, refer to "Edit Menu" on page 603.
The CodeWarrior IDE provides several checks that help you balance these elements correctly.
To check for balanced parentheses, brackets, or braces, place the insertion point in the text you want to check. Then, choose Balance from the Edit Menu. Alternatively, double-click on a parenthesis, bracket, or brace character that you want to check for a matching character.
TIP
You can have the editor check for balanced punctuation automatically. If you would like to learn more about checking the balance of code automatically as you type, refer to "Balance while typing" on page 271.
Use the Shift Left and Shift Right commands on the Edit Menu to shift a block of text to the left or right.
To shift blocks of text, select a block of text. If you don't know how to do this, refer to "Selecting Text" on page 148. After selecting, choose Shift Right or Shift Left from the Edit Menu.
To learn more about controlling the number of spaces the text is indented, refer to "Font & Tabs" on page 273.
The CodeWarrior editor supplies ways to Undo mistakes as you edit a file.
The Undo command reverses the effect of your last action. The name of the Undo command on the Edit Menu varies depending on your last action. For example, if you just typed in some text, the command changes to Undo Typing. Choose Undo Typing to remove the text you just typed.
When the Use multiple undo option is on, you can Undo, Redo, Multiple Undo, and Multiple Redo previous actions by continuing to choose the Undo or Redo commands.
For instance, if you Cut a word, then Paste it, then type some text, you can backtrack all those actions by choosing Undo three times. The first Undo removes the text you typed, the second Undo unpastes the text you pasted, and the third Undo uncuts the text you Cut, therefore returning the text to its original condition.
You can perform those activities again in the same order by choosing the Redo command three times.
To enable the Use multiple undo option, refer to "Use multiple undo" on page 272.
Note that the keyboard shortcut for the Redo command changes when the Use multiple undo option is turned off.
WARNING!
ABCDE), and you redo two of them, the stack appears to the pointer like this: ABC. When you perform a new action (ABCF), the undo events (DE) are no longer available.
The Revert command on the File Menu returns a file to its last saved version. To learn more about how to revert to the previous version of a file, see "Reverting to a Previously-Saved File" on page 125.
You can use color to highlight many elements in your source code, such as comments, keywords, and quoted character strings. Highlighting these elements helps you identify them in the text, so you can check your spelling and syntax as you type by recognizing color patterns. For information on configuring color syntax options, see "Syntax Coloring" on page 274.
You can also highlight custom keywords, which are in a list of words you designate. See "Syntax Coloring" on page 274 for instructions on configuring the editor to do this for you.
The CodeWarrior editor provides several methods for navigating a file that you are editing.
This section covers these methods:
You can change the key bindings that cause the text insertion point to move around in a file. Refer to "Editor Commands" on page 651 for more information.
 Click the Routine icon to display the Routine pop-up menu, discussed in "Routine Pop-Up Menu" on page 136, then select the routine you want to access.
NOTE
To add a marker, move the text insertion point to the location in the text you want to mark, then choose Add marker from the Marker Pop-Up Menu. A dialog box named Add Marker appears, shown in Figure 5.9.
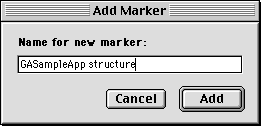
When you are through adding your text note, click Add and your marker will be visible in the Marker Pop-Up Menu, as shown in Figure 5.10.
TIP
#pragma
#pragma mark myMarker
to leave markers in a file. For Pascal, use
{$PRAGMAC MARK myMarker}
When embedded in your file, this example adds myMarker to the Routine Pop-Up Menu automatically when the file is opened in the editor.
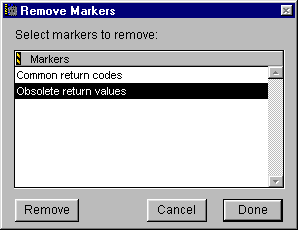
To remove a marker, click the Marker Pop-Up Menu and choose the Remove markers command. The dialog box shown in Figure 5.11 is shown, and you may select the marker you wish to delete. After you select the marker, click Remove to remove it permanently from the marker list. When finished, click Done to close the Remove Markers dialog box.
Click the Marker Pop-Up Menu and choose the name of the marker from the list shown on the pop-up to set the text insertion point at the location of the marker.
Use the Interface Pop-Up Menu shown in Figure 5.2 on page 136 to open interface or header files referenced by the current file. You can also use the Touch and Untouch commands from this pop-up.
To open a file in the list, choose the corresponding item from the menu.
There is another method for opening an interface or header file that your source code file uses. To open the related file, type Control-D (Windows) or Command-D (Mac OS and Solaris) after selecting the file name in the active window. To learn more about this method for opening files, refer to "Opening an Existing File" on page 108.
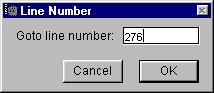
Click the Line Number Button  on the editor window to open the Line Number dialog box shown in Figure 5.12. Then enter the number of the line you want to go to and select OK.
The Go Back and Go Forward commands are only available when you use the Browser. If you already have the Browser enabled, refer to "Go Back and Go Forward" on page 242 for information about how to use these commands.
If you aren't using the Browser and want to learn how to use it, see "Browsing Source Code" on page 205.
The CodeWarrior IDE allows you to customize key bindings for the editor to suit your working style. Refer to "Editor Commands" on page 651 to learn about the commands you can customize to your liking.
You can open the directory that contains the file on display in the active editor window. Just click the Path Pop-Up Menu (Mac OS) and choose any directory you want to open from the pop-up, as shown in Figure 5.6 on page 141.
The topics in this section are:
This method lets you find the definition of a symbol in your project source files. If the symbol isn't defined in your project, CodeWarrior finds the symbol's definition in the online documentation viewer selected in IDE Extras preferences panel. Supported online reference viewers include WinHelp (Windows), QuickHelp (Mac OS), QuickView (Mac OS), or THINK Reference (Mac OS).
To look up the definition of a symbol, first select the symbol name in your source code. Then, choose Find Definition from the Search Menu. If you don't want to use the Search menu you can instead Alt/Command double-click on the symbol's name. CodeWarrior searches all the files in your project for the definition of the symbol.
If CodeWarrior finds one or more matches in your project, it opens a window and displays each of the matches for you to examine. If the Browser is enabled, the window shown will be a browser Symbol window (see "Symbol Window" on page 224). Otherwise, the window will be a Message window (see "Using the Message Window" on page 376).
You can also use the Find Reference and Find Definition & Reference commands to look up symbol definitions. When you choose the Find Reference (Mac OS) command, CodeWarrior searches the on-line documentation selected in IDE Extras preferences panel (see "IDE Extras" on page 254) for the definition of the selected symbol. If a match is found in the on-line documentation, a viewer is launched and the information displayed. With the Find Definition & Reference (Mac OS) command, CodeWarrior searches the source code files as well as the on-line reference for the definition of the symbol.
TIP
TIP
To use WinHelp, choose CodeWarrior IDE from the Help menu. The help file for the IDE is displayed.
Refer to "Finding Symbol Definitions" on page 159 to begin looking up documentation online.
To use QuickHelp, choose CodeWarrior IDE from the Help menu. The help file for the IDE is displayed.
Refer to "Finding Symbol Definitions" on page 159 to begin looking up documentation online.
2. Remove multiple copies of the QuickView application.
3. Select QuickView as the on-line reference.
Refer to "IDE Extras" on page 254 to learn how to select the QuickView application as the online reference database for your project.
Refer to "Inserting Routine (Reference) Templates (Mac OS)" on page 162 or "Finding Symbol Definitions" on page 159 to begin looking up documentation online.
To use THINK Reference with the CodeWarrior IDE, refer to "IDE Extras" on page 254 to enable the THINK Reference application as the online reference database for your project.
Refer to "Inserting Routine (Reference) Templates (Mac OS)" on page 162 or "Finding Symbol Definitions" on page 159 to begin looking up documentation online.
A routine template looks like this:
SetRect(r, left, top, right, bottom);
To insert a reference template into your code, type the routine name that you want to insert, then select the name you just typed. Finally, choose Insert Reference Template (Mac OS) from the Edit Menu.
The CodeWarrior IDE searches for the routine in either QuickView (Mac OS) or THINK Reference (Mac OS), starting the required application if it isn't already running. If the routine is found, the template is copied into your editor window and replaces the text you selected with the template. If the definition is not found, you will hear a beep.
HyperHelp support will be available in future versions of the CodeWarrior IDE for Solaris.
 To create a new pane in an editor window, click and drag a Splitter Bar. Splitter bars are on each scroll bar of a pane in the editor window, on the top and left sides.
  To remove a pane from an editor window, click and drag a Resize Box all the way to an edge of the window.